Dear All,
In this blog I am trying to give you step by step tutorial for Automation using TestComplete. I am covering below items in this blog -
1- Adding New Project
2- Adding New Unit
3- Scripting
4- Run and Result
Before Going to add New Project in TestComplete, You Need to Launch TestComplete First -
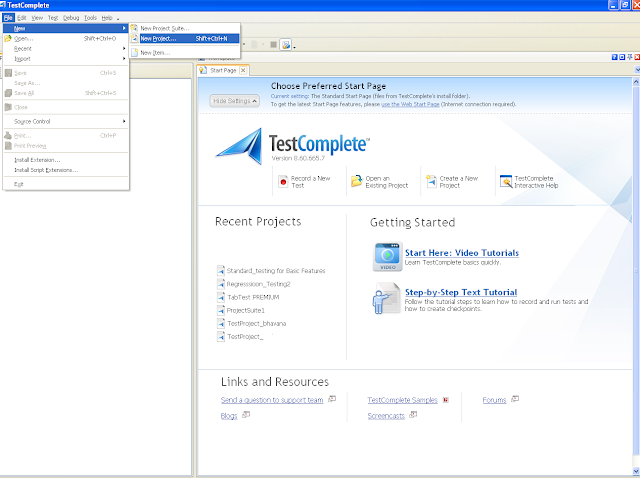
* Go To Start → All Program → Automated QA → TestComplete or Double click on TestComplete Shortcut. When You launch TestComplete below page will display. This page is called Start page for TestComplete.
 On a Start page you will get the details about your Recent Projects, You can Open Your Existing Projects, You can Create/Add new Project too.
1- Adding New Project :→ Before start Automation in TestComplete you need to create a project in it. Follow the instruction to create a new Project in TC -
When you click on "New Project", Create New Project dialog box will display, here you need to Specify, Your Project Name and Location where you want to store your project

Project Name Text Box → Enter Your Project Name.
Location → Browse your Folder/Location where you want to store your script.
Once you Specify Project Name and Location, You Need to Click on "Next" Button, on Click of Next Button Tested Application Type dialog box will display.
In Tested Application type dialog box, You can Select your application type -
1- Web Application
2- Window Application
3- Java
4- Adobe AIR etc..

(Here I am going to Test Web based Application, hence I have select "Web")
Select Your application type and Click on "Next" Button. on Click of Next Button - Web Application Setting dialog box will display, In this dialog box you can select -
1- Functional Testing of Web Page
2- Load Testing of Web Server
3- Web Service Testing
 (Here I am going to Test Functionality of Web Page Hence I have Selected Functional Testing of Web Page)
Select your Setting and Click on Next Button, on Click of Next Button - Tested Web Pages dialog box will display. This dialog box is optional you can click on Next Button without adding any details

If you want to add your Tested Web Pages, You Need to Click on Add Button, When you Click on Add Button below dialog box will display.


Test Visualizer is most important feature in TestComplete, It will captures all your details into a Pictorial format, so it will be help you to understand your script. You may checked Test Visualizer Setting or unchecked and click on Next Button, If you unchecked Test Visualizer Setting It won't be capture image of your script.
Once you Click on Next Button - Scripting Language dialog box will display, here you can select any scripting language from below -
1- VBScript
2- Jscript
3- DelphiScript
4- ConnectedApp Script (under ConnectedApp Scripting language we can select C# or C++)
 Select Your Scripting language and Click on Finish button or Double click on your Scripting language. When you click on Finish Button, your project has been created Successfully and It will be show you Project workspace/Explorer screen -

In Project workspace/Explorer you can prepared your script using either recording or any of the scripting language like -
1- VBScript
2- Jscript
3- DelphiScript
4- ConnectedApp Script (under ConnectedApp Scripting language we can select C# or C++).


Now Click on OK Button , when you click on OK button your Script unit has been added Successfully.

here you can write your script by using your selected scripting language as above.

 2- Go on Project Explorer → Select your script → Right Click on it → Run (your Script) Routine


In this blog I am trying to give you step by step tutorial for Automation using TestComplete. I am covering below items in this blog -
1- Adding New Project
2- Adding New Unit
3- Scripting
4- Run and Result
Before Going to add New Project in TestComplete, You Need to Launch TestComplete First -
* Go To Start → All Program → Automated QA → TestComplete or Double click on TestComplete Shortcut. When You launch TestComplete below page will display. This page is called Start page for TestComplete.

1- Adding New Project :→ Before start Automation in TestComplete you need to create a project in it. Follow the instruction to create a new Project in TC -
* File → New →New Project

When you click on "New Project", Create New Project dialog box will display, here you need to Specify, Your Project Name and Location where you want to store your project

Project Name Text Box → Enter Your Project Name.
Location → Browse your Folder/Location where you want to store your script.
Once you Specify Project Name and Location, You Need to Click on "Next" Button, on Click of Next Button Tested Application Type dialog box will display.
In Tested Application type dialog box, You can Select your application type -
1- Web Application
2- Window Application
3- Java
4- Adobe AIR etc..

(Here I am going to Test Web based Application, hence I have select "Web")
Select Your application type and Click on "Next" Button. on Click of Next Button - Web Application Setting dialog box will display, In this dialog box you can select -
1- Functional Testing of Web Page
2- Load Testing of Web Server
3- Web Service Testing

Select your Setting and Click on Next Button, on Click of Next Button - Tested Web Pages dialog box will display. This dialog box is optional you can click on Next Button without adding any details

If you want to add your Tested Web Pages, You Need to Click on Add Button, When you Click on Add Button below dialog box will display.

In this dialog box you need to specify - Name, Browser and URL of your page and Click on Next Button, Once you click on Next Button - Test Visualizer Setting pop-up will appear

Once you Click on Next Button - Scripting Language dialog box will display, here you can select any scripting language from below -
1- VBScript
2- Jscript
3- DelphiScript
4- ConnectedApp Script (under ConnectedApp Scripting language we can select C# or C++)


In Project workspace/Explorer you can prepared your script using either recording or any of the scripting language like -
1- VBScript
2- Jscript
3- DelphiScript
4- ConnectedApp Script (under ConnectedApp Scripting language we can select C# or C++).
2- Adding New Unit :→ Before
going to to automate your project you need to Add Scripting unit in your project. Follow the instruction to add script unit in your project -
* Go on Project
Workspace/Explorer → Select Your Project Name → Double Click on Advance → Right click on
“Script” → Add → Click on New Item

On click
of New Item, Item Type dialog box will appear, here you need to specify your script name and location, where you want to store your script

Name Text Box - BrowserLaunching (My Script name)
Location - D:\Demo\Demo\Script\ (Location where I want to store my Script)


here you can write your script by using your selected scripting language as above.
3- Scripting :→ here I am going to demonstrate writing a script which is writing in VBScript, In this script I am going to create a Sub Routine named as Browser here I have Created a Object IE for Internet Explorer and made it visible, once browser is launched successfully it will be navigate on Google web page
Sub Browser
Dim IE
Set IE = CreateObject("InternetExplorer.Application")
IE.Visible = True
IE.Navigate"http://google.com"
Delay(1000)
End Sub

4 - Run Script - Once your script has been completed you need to run it. There are different ways to run your script-
1- Select Your Script → Right Click on it → Click on Run Current Routine


3 - Select Run Option in your Tool bar.
Once your execution is done it will show you the result like below

Thanks All, This may help you to start automation testing in TestComplete.